A Comprehensive Guide to Migrating On-Premise Oracle Data to Databricks Unity Catalog with Python and Databricks Notebook
Seamlessly establish connectivity between the Oracle database and Databricks
Benefits
Migrate your database data and schemas to Databricks in minutes.
Stream operational data from Oracle to your data lake in real-time
In today’s data-driven world, businesses are constantly seeking ways to enhance data accessibility and accelerate analytics workflows. In this comprehensive guide, we will explore how to seamlessly bring data from an on-premise Oracle database to Databricks Unity Catalog using the powerful combination of Databricks Notebook and Python. Databricks Unity Catalog serves as an enterprise data catalog and collaborative platform for data discovery and management, enabling organizations to centralize and leverage their data assets effectively. Additionally, Striim is a robust real-time data integration platform, which complements Databricks Unity Catalog by facilitating continuous data ingestion and synchronization. By following these step-by-step instructions, you’ll be able to harness the benefits of cloud computing, streamline data integration, and enable data agility for your organization with the integration of Databricks Unity Catalog and Striim.
Before diving into the migration process, ensure you have the following prerequisites in place:
- Access to a Striim instance: You will need a functional Striim instance configured to communicate with the source Oracle database and the Databricks environment. If you don’t have a Striim instance set up, refer to the Striim Cloud documentation for deployment and configuration instructions.
- Access to a Databricks instance with Unity Catalog enabled: To migrate data from the on-premise Oracle database to Databricks Unity Catalog, you’ll need access to a Databricks instance where Unity Catalog is enabled. If you are unsure how to enable Unity Catalog in your Databricks instance, you can follow the instructions provided in the Databricks documentation: Enabling Unity Catalog.
- Familiarity with creating Databricks clusters and notebooks.
- Ensure that you have created the necessary target schema and tables within the Databricks database prior to proceeding.
Once you have ensured that you meet the prerequisites, follow the steps below to setup your Databricks environment:
Step 1: Create a Databricks Cluster
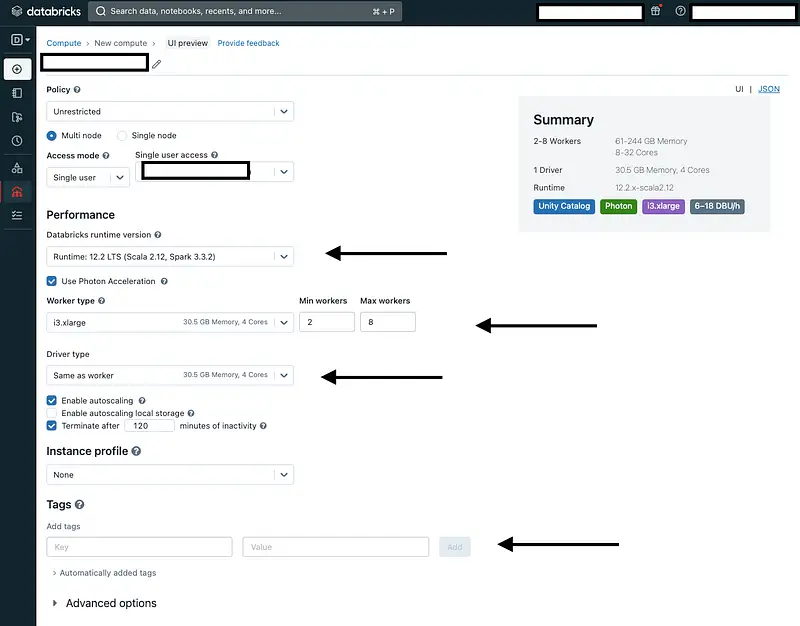
In your Databricks instance, navigate to the cluster creation interface. Configure the cluster settings according to your requirements, such as the cluster type, size, and necessary libraries.
Additionally, make sure to set the following environment variables by clicking on “Advanced Options” and selecting “Spark”:
DATABRICKS_ACCESS_TOKEN=<access_token>PYSPARK_PYTHON=/databricks/python3/bin/python3
ORACLE_JDBC_URL=<jdbc_oracle_conn_url>
DATABRICKS_JDBC_URL=<jdbc_databricks_conn_url>
DATABRICKS_HOSTNAME=<databricks_host>
ORACLE_USERNAME=<oracle_username>
STRIIM_USERNAME=<striim_username> # We will be using the ‘admin’ user
ORACLE_PASSWORD=<oracle_password>
STRIIM_PASSWORD=<striim_pass>
STRIIM_IP_ADDRESS=<striim_ip_address> #Example: <ip_address>:9080
Later in our Databricks notebook, we will extract the values of these environment variables to obtain a Striim authentication token and create our first data pipeline.
Note: To adhere to best practices, it is recommended to use Databricks Secrets Management for storing these credentials securely. By leveraging Databricks Secrets Management, you can ensure that sensitive information, such as database credentials, is securely stored and accessed within your Databricks environment. This approach helps enhance security, compliance, and ease of management.
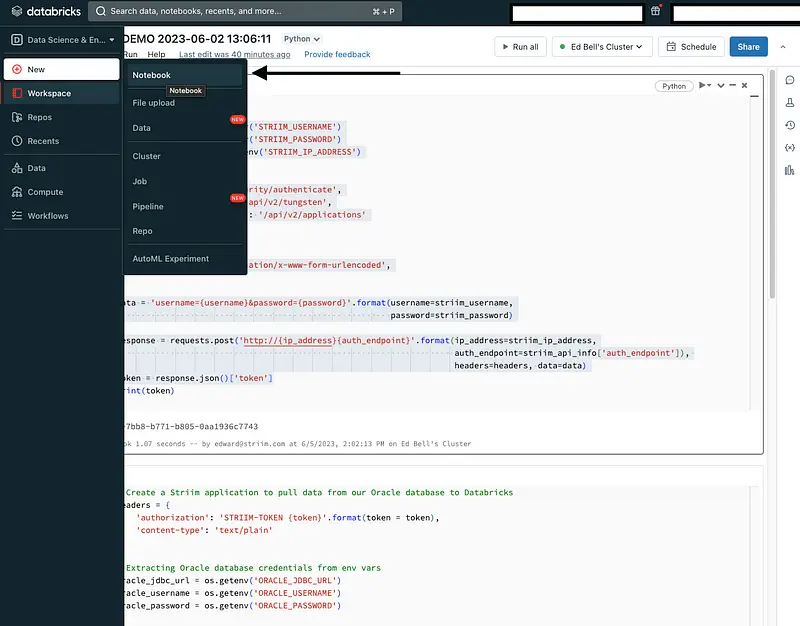
Create a Databricks Notebook: With the cluster up and running, you are ready to create a notebook. To do this, click on “New” in the Databricks workspace interface and select “Notebook.” Provide a name for your notebook and choose the desired programming language (Python) for your notebook.
By creating a notebook, you establish an environment where you can write and execute Python code to perform the necessary data extraction, and loading tasks using Striim.
Once you have created your Databricks Python Notebook, follow the steps below to begin bringing data from an on-prem Oracle database to Databricks Unity Catalog:
Generate an Authentication Token: To interact with the Striim instance programmatically, we will use the Striim REST API. The first step is to generate an authentication token that will allow your Python code to authenticate with the Striim instance:
import requests, osstriim_username = os.getenv(‘STRIIM_USERNAME’)
striim_password = os.getenv(‘STRIIM_PASSWORD’)
striim_ip_address = os.getenv(‘STRIIM_IP_ADDRESS’) #Example: <Striim_IP_Address>:9080
striim_api_info = {
‘auth_endpoint’: ‘/security/authenticate’,
‘tungsten_endpoint’: ‘/api/v2/tungsten’,
‘applications_endpoint’: ‘/api/v2/applications’
}
headers = {
‘Content-Type’: ‘application/x-www-form-urlencoded’,
}
data = ‘username={username}&password={password}’.format(username=striim_username,
password=striim_password)
response = requests.post(‘http://{ip_address}{auth_endpoint}’.format(ip_address=striim_ip_address,
auth_endpoint=striim_api_info[‘auth_endpoint’]), headers=headers, data=data)
token = response.json()[‘token’]
The code snippet generates an authentication token by making an HTTP POST request to the Striim REST API. It retrieves the Striim username, password, and IP address from environment variables, sets the necessary headers, and sends the request to the authentication endpoint. The authentication token is then extracted from the response for further API interactions.
Step 2: Create a Striim Application
With the authentication token in hand, you will use Python and the Striim REST API to create a Striim application. This application will serve as the bridge between the Oracle database and Databricks.
headers = {
'authorization': 'STRIIM-TOKEN {token}'.format(token = token),
'content-type': 'text/plain'
}

# Extracting Oracle database credentials from env vars
oracle_jdbc_url = os.getenv('ORACLE_JDBC_URL')
oracle_username = os.getenv('ORACLE_USERNAME')
oracle_password = os.getenv('ORACLE_PASSWORD')

# Extracting Databricks credentials from env vars
databricks_hostname = os.getenv('DATABRICKS_HOSTNAME')
databricks_jdbc_url = os.getenv('DATABRICKS_JDBC_URL')
databricks_access_token = os.getenv('DATABRICKS_ACCESS_TOKEN')

app_data = '''
CREATE APPLICATION InitialLoad_OracleToDatabricks;
CREATE SOURCE Oracle_To_Databricks USING Global.DatabaseReader (
Username: '{oracle_username}',
QuiesceOnILCompletion: false,
DatabaseProviderType: 'Oracle',
ConnectionURL: '{oracle_jdbc_url}',
FetchSize: 100000,
Password_encrypted: 'false',
Password: '{oracle_password}',
Tables: 'DMS_SAMPLE.NBA_SPORTING_TICKET' )
OUTPUT TO ORACLE_OUTPUT;
CREATE OR REPLACE TARGET Databricks USING Global.DeltaLakeWriter (
hostname: '{databricks_hostname}',
Tables: 'DMS_SAMPLE.NBA_SPORTING_TICKET,main.default.nba_sporting_ticket',
Mode: 'APPENDONLY',
stageLocation: '/',
ParallelThreads: '12',
personalAccessToken: '{databricks_access_token}',
CDDLAction: 'Process',
adapterName: 'DeltaLakeWriter',
personalAccessToken_encrypted: 'false',
uploadPolicy: 'eventcount:100000,interval:5s',
ConnectionRetryPolicy: 'initialRetryDelay=10s, retryDelayMultiplier=2, maxRetryDelay=1m, maxAttempts=5, totalTimeout=10m',
connectionUrl: '{databricks_jdbc_url}' )
INPUT FROM ORACLE_OUTPUT;
END APPLICATION InitialLoad_OracleToDatabricks;
'''.format(oracle_username=oracle_username,
oracle_jdbc_url=oracle_jdbc_url,
oracle_password=oracle_password,
databricks_hostname=databricks_hostname,
databricks_access_token=databricks_access_token,
databricks_jdbc_url=databricks_jdbc_url)

response = requests.post('http://{ip_address}{tungsten_endpoint}'.format(ip_address=striim_ip_address,
tungsten_endpoint=striim_api_info['tungsten_endpoint']),
headers=headers,
data=app_data)
The provided code creates a Striim application named InitialLoad_OracleToDatabricks to migrate the DMS_SAMPLE.NBA_SPORTING_TICKET Oracle table.
The code sets the necessary headers for the HTTP request using the authentication token obtained earlier. It retrieves the Oracle database and Databricks credentials from the environment variables.
Using the retrieved credentials, the code defines the application data, specifying the source as the Oracle database using the Global.DatabaseReader adapter, and the target as Databricks using the Global.DeltaLakeWriter adapter. More information of the Delta Lake Writer adapter can be found here: https://www.striim.com/docs/en/databricks-writer.html
After formatting the application data with the credentials and configuration details, the code sends a POST request to the Striim tungsten endpoint to create the application.
To verify that it was created successfully, we will log in to the Striim console and go to the “Apps” page:
Step 3: Deploy and Start the Striim Application
Once the Striim application is created, we will deploy and start it using the following HTTP POST requests:
headers = {

   'Authorization': 'STRIIM-TOKEN {token}'.format(token=token),

   'Content-Type': 'application/json',

}

# POST Request to DEPLOY the application

response = requests.post(

   'http://{ip_address}{applications_endpoint}/admin.InitialLoad_OracleToDatabricks/deployment'.format(ip_address=striim_ip_address, applications_endpoint=striim_api_info['applications_endpoint']),

   headers=headers,

)

# POST Request to START the application

response = requests.post(

   'http://{ip_address}{applications_endpoint}/admin.InitialLoad_OracleToDatabricks/sprint'.format(ip_address=striim_ip_address, applications_endpoint=striim_api_info['applications_endpoint']),

   headers=headers,

)
Step 4: Validate the Striim Application Status and Metrics
Output:
headers = {

   'authorization': 'STRIIM-TOKEN {token}'.format(token=token),

   'content-type': 'text/plain',

}

target_component_name = 'mon admin.Databricks;'

post_response = requests.post('http://{ip_address}{tungsten_endpoint}'.format(ip_address=striim_ip_address,

                                                                     tungsten_endpoint=striim_api_info['tungsten_endpoint']),

                       headers=headers,

                       data=data)

response_summary = post_response.json()

print("Status: ", target_response_summary[0]['executionStatus'])

print("Timestamp: ", target_response_summary[0]['output']['timestamp'])

print("Total Input (Read): ", target_response_summary[0]['output']['input'])

print("Total Input (Read): ", target_response_summary[0]['output']['output'])
Output:
Status:  Success

Timestamp:  2023-06-07 16:41:26

Total Input (Read):  1,510,000

Total Input (Read):  1,510,000
If the Total Output and Input values are equal, it indicates the successful migration of Oracle data to the Databricks catalog. To further validate the completeness of the migration, execute the following query in the Databricks editor to verify the total count of our NBA_SPORTING_TICKET table:

Conclusion
In conclusion, this comprehensive guide has walked you through the process of migrating data from an on-premise Oracle database to the Databricks Unity Catalog using Databricks Notebook and Python. By leveraging the power of Striim and its REST API, we were able to seamlessly establish connectivity between the Oracle database and Databricks. Through the step-by-step instructions and code snippets provided, you have learned how to generate an authentication token, create a Striim application, and deploy it to facilitate the data transfer process. With the integration of Databricks’ data processing capabilities and the centralized data catalog provided by the Unity Catalog, organizations can unlock data agility and enable streamlined data integration.
Wrapping Up: Start your Free Trial Today
In this recipe, we have walked you through steps for migrating on-premise Oracle Data to Databricks Unity Catalog with Python and Databricks Notebook. You can easily set up a streaming app by configuring your Databricks target. As always, feel free to reach out to our integration experts to schedule a demo, or try Striim developer for free here.
Tools you need

Striim
Striim’s unified data integration and streaming platform connects clouds, data and applications.

Databricks
Databricks combines data warehouse and Data lake into a Lakehouse architecture

Python
Python is a high-level, general-purpose programming language. Its design philosophy emphasizes code readability with the use of significant indentation via the off-side rule.


