Connecting Striim Cloud on Google Cloud Platform to data services behind Striim Forwarding Agent
This topic explains how to use a Striim Forwarding Agent when you prefer to push data to Striim Cloud rather than allowing Striim to initiate direct connections to your sources. It describes how to enable a secure, private connection from a Striim Forwarding Agent (running on-premises or in another cloud) to Striim Cloud (hosted on Google Cloud) by leveraging your GCP VPC and Google Cloud Private Service Connect (PSC).
Overview
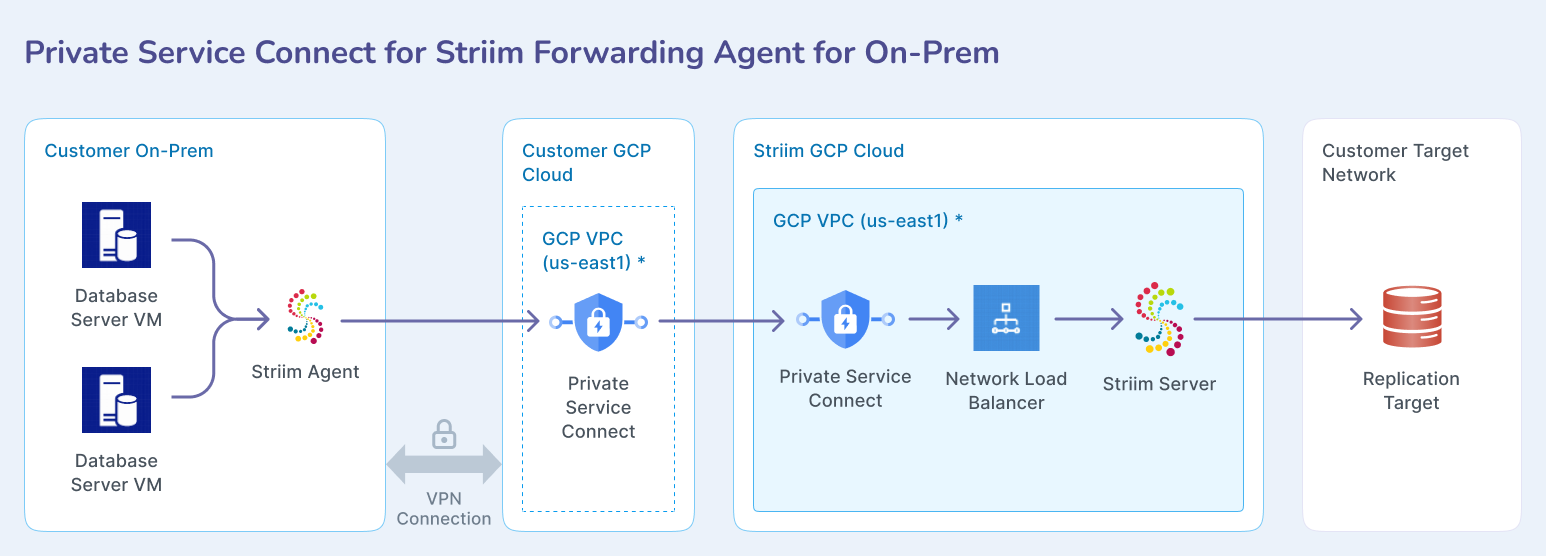
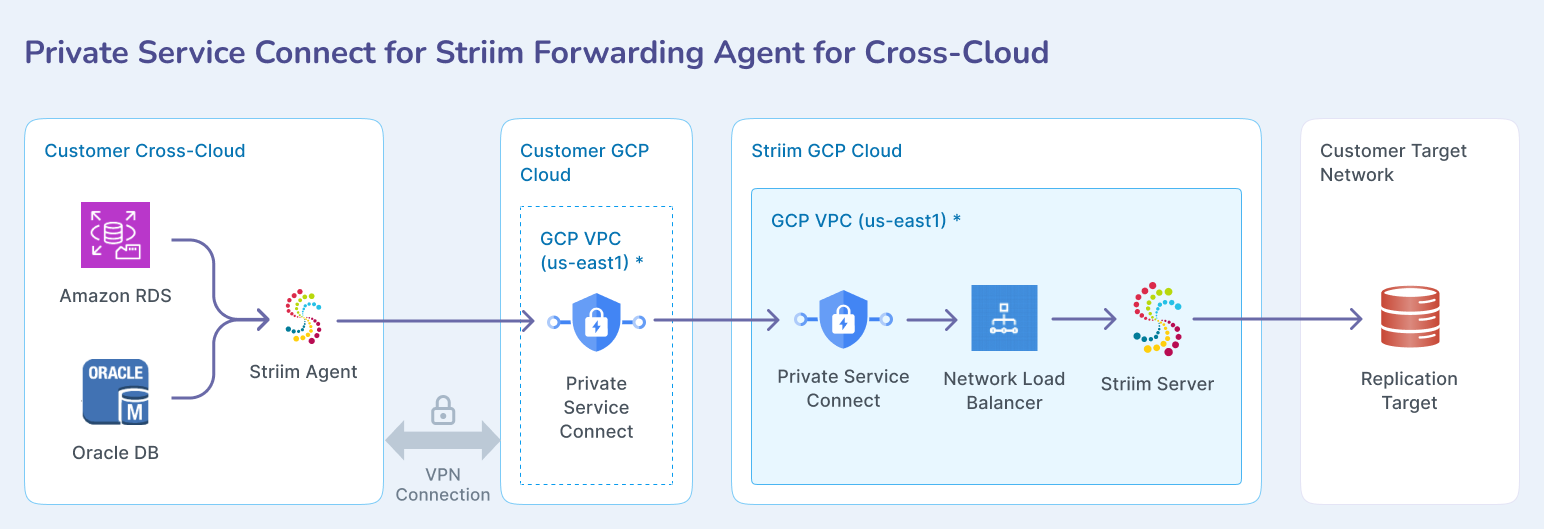
The Striim Forwarding Agent reaches Striim Cloud without using the public internet. Traffic stays on private networks: Striim Forwarding Agent → your GCP VPC (via Interconnect/VPN/peering) → PSC endpoint → Striim Cloud.
When the source VM already runs inside GCP, only a PSC connection between your project and Striim is required.
What this topic covers
Using your GCP network as the private transit for Striim Forwarding Agent → Striim Cloud.
Creating a PSC Published Service / Service Attachment (Striim side) and a PSC Endpoint (customer side), or vice-versa per agreed pattern.
Support for Striim Forwarding Agents located:
On-premises (via Cloud Interconnect or VPN into customer GCP VPC)
Cross-cloud (AWS/Azure/Oracle Cloud Infrastructure (OCI)) with private connectivity into customer GCP VPC
GCP (native VMs or Google Kubernetes Engine (GKE) in the customer project)
For on-premises Striim Forwarding Agents, the connection routes through your GCP VPC via VPN to reach Striim Cloud privately:
For cross-cloud Striim Forwarding Agents in AWS, Azure, or OCI, the connection routes through your GCP VPC via inter-cloud connectivity to reach Striim Cloud privately:
Prerequisites
A GCP project & VPC capable of hosting a PSC endpoint.
Private connectivity from Striim Forwarding Agent location to the customer GCP VPC (Interconnect, VPN, or peering).
Appropriate IAM to create and approve PSC resources.
VPC firewall rules allowing traffic from the Striim Forwarding Agent to the PSC endpoint and onward to Striim Cloud over ports - 30000, 30002, 30003, 30005, 30006, and 30010.
A Striim service with admin role to the striim cloud account as well as Customer GCP console.
Striim service (sys) password
Prepare customer VPN with on-prem/cross-cloud network
GCP-to-AWS VPN(classic): see Site-to-Site VPN Between GCP and AWS Cloud.
GCP-to-On-prem: see Creating a site-to-site VPN tunnel in Google Cloud (GCP) to set up a Virtual Private Cloud (VPC) network, and configure a Cloud VPN gateway.
Provision Private Link access from the Striim Cloud console
You can provision the service attachment for your service directly from the Striim Cloud console. No support ticket is required.
Log in to your Striim Cloud account and open the service you want to connect the agent to.
Navigate to the Secure Connection tab, then select the Service Attachments tab.
Click Create Service Attachment and enter your Google Cloud project number. Connection requests originating from this subscription are whitelisted for automatic approval.
Example Google Cloud project number:
123456789012
Allow a few minutes for the service attachment to be provisioned. When provisioning is complete, the service attachment and its connection details are displayed in the Service Attachments tab, and an email notification containing the connection details, including the service attachment, is sent to you.
Example service attachment:
projects/saas-acme/regions/us-east1/serviceAttachments/abcd1ef2-34567-8-psc-sa
Step-by-step process to setup private service connect (PSC)
This process involves coordination between you and the Striim team to establish the PSC connection. The Striim team provides the service attachment, while you create the corresponding PSC endpoint in your GCP project.
Prepare striim network:
The customer submits a request to the prepaid Striim service with Private Service Connect for forwarding agent compatibility
Striim information sharing list for customer:
The Striim team prepares the environment and shares the Private Service Connect attachment with the customer. The PSC attachment looks like:
projects/saas-app1-stg/regions/us-west1/serviceAttachments/k8s1-sa-o2br638g-defau
The Striim team also shares the Striim service sys password to generate the Striim agent key-store password
Create Private service connect connection in customer GCP network:
The customer's GCP VPC network must be in the same region as the Striim service.
Create a subnet to host Private Service Connect.
Create a private static IP address from the psc-subnet IP range.
Create the Private Service Connect connection using the PSC attachment shared by the Striim team.
After successfully creating the PSC, you can check in the GCP console within the private service connect service page, under CONNECTED ENDPOINTS. This PSC will show in Pending state until the request is accepted by the Striim team.
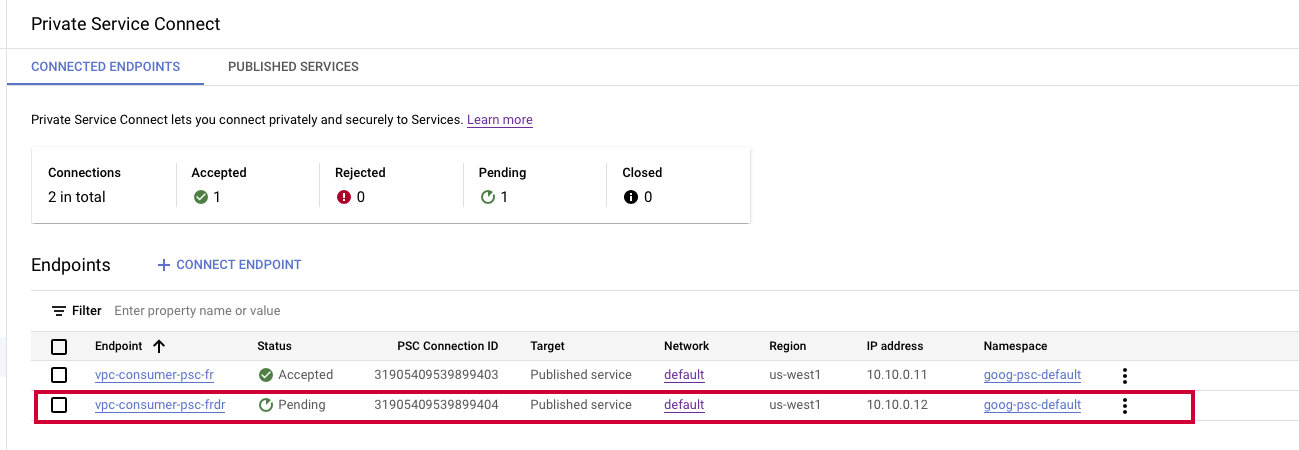
Once the Striim team accepts the connection, the PSC endpoint status will change to Approved.
Test the connection from the customer network:
SSH to the Striim Forwarding Agent VM
Use the telnet command to check connection using PSC endpoint IP e.g. 10.10.0.12
telnet 10.10.0.12 30000
Also try the following ports: 30001, 3003, 30010-30200
Configure the Agent VM for a new installation
Complete the following tasks on the agent VM to install the Striim Agent, configure it to connect to your Striim cluster, and set up the keystore. Perform the steps in the order shown.
Verify Java version
The agent requires Java 17 for Striim versions 5.4.0.2 and later.
java -version
Install Java 17 if it is not already present.
Download and install the agent
Download the Striim Agent package matching your service version (e.g., Striim_Agent_<striim-version>.tgz).
tar -xvzf Striim_Agent_<striim-version>.tgz
sudo mkdir -p /opt/striim
sudo cp -r Agent /opt/striim/
sudo chown -R root:root /opt/striim
sudo chmod +x /opt/striim/Agent/bin/*.sh
Update /etc/hosts
Add the following entries to /etc/hosts, replacing <endpoint-IP> with the PSC endpoint IP address from the Striim email.
<endpoint-IP>  striim-node-0.striim-subdomain.default.svc.cluster.local
<endpoint-IP>  stream-proxy-deployment.stream-proxy-service.default.svc.cluster.local
Note
For Striim Cloud Mission Critical also add:
<endpoint-IP> striim-node-1.striim-subdomain.default.svc.cluster.local
Configure agent.conf
Edit /opt/striim/Agent/conf/agent.conf with the following content:
######################
## Basic fields for agent
######################
striim.cluster.clusterName=Striim
striim.cluster.hazelcast.discovery.enabled=false
striim.cluster.deploymentGroups=Agents
striim.cluster.https.enabled=true
striim.node.servernode.address=striim-node-0.striim-subdomain.default.svc.cluster.local
striim.node.httpPort=30002
striim.node.httpsPort=30003
striim.node.hazelcast.port=30000
striim.hazelcast.client.smartrouting=false
striim.cluster.stream.proxy.address=tcp://stream-proxy-deployment.stream-proxy-service.default.svc.cluster.local:30005
striim.cluster.stream.proxy.heartbeat.address=tcp://stream-proxy-deployment.stream-proxy-service.default.svc.cluster.local:30006

# Memory settings — adjust based on VM size
MEM_MIN=256m
MEM_MAX=1024m
Note
For Striim Cloud Mission Critical also add:
<endpoint-IP> striim-node-(n).striim-subdomain.default.svc.cluster.local
If you have multiple nodes, add an entry for each node. For example, for two nodes you would add:
<endpoint-IP>  striim-node-0.striim-subdomain.default.svc.cluster.local
<endpoint-IP>  striim-node-1.striim-subdomain.default.svc.cluster.local
Set up the keystore
Run the keystore setup utility and enter the Striim sys user password when prompted:
cd /opt/striim/Agent/bin
sudo ./aksConfig.sh
sudo chown striim /opt/striim/Agent/conf/aks.jks
sudo chown striim /opt/striim/Agent/conf/aksKey.pwd
Validate Network Connectivity
Before starting the agent, verify that your VM can reach the PSC endpoint on all required ports:
telnet <endpoint-IP> 30000   # Hazelcast — must succeed for agent to connect
telnet <endpoint-IP> 30002   # HTTP
telnet <endpoint-IP> 30003   # HTTPS
telnet <endpoint-IP> 30005
telnet <endpoint-IP> 30006
telnet <endpoint-IP> 30010
On Windows, use Test-NetConnection -ComputerName <endpoint-IP> -Port <port> instead.
Start the Agent
For the first run, start the agent manually so you can see live output:
cd /opt/striim/Agent/bin
sudo ./agent.sh
A successful start looks like:
Striim Agent: Version 5.4.2 (...)
Connecting to cluster Striim.......connected
Verify in the Striim UI
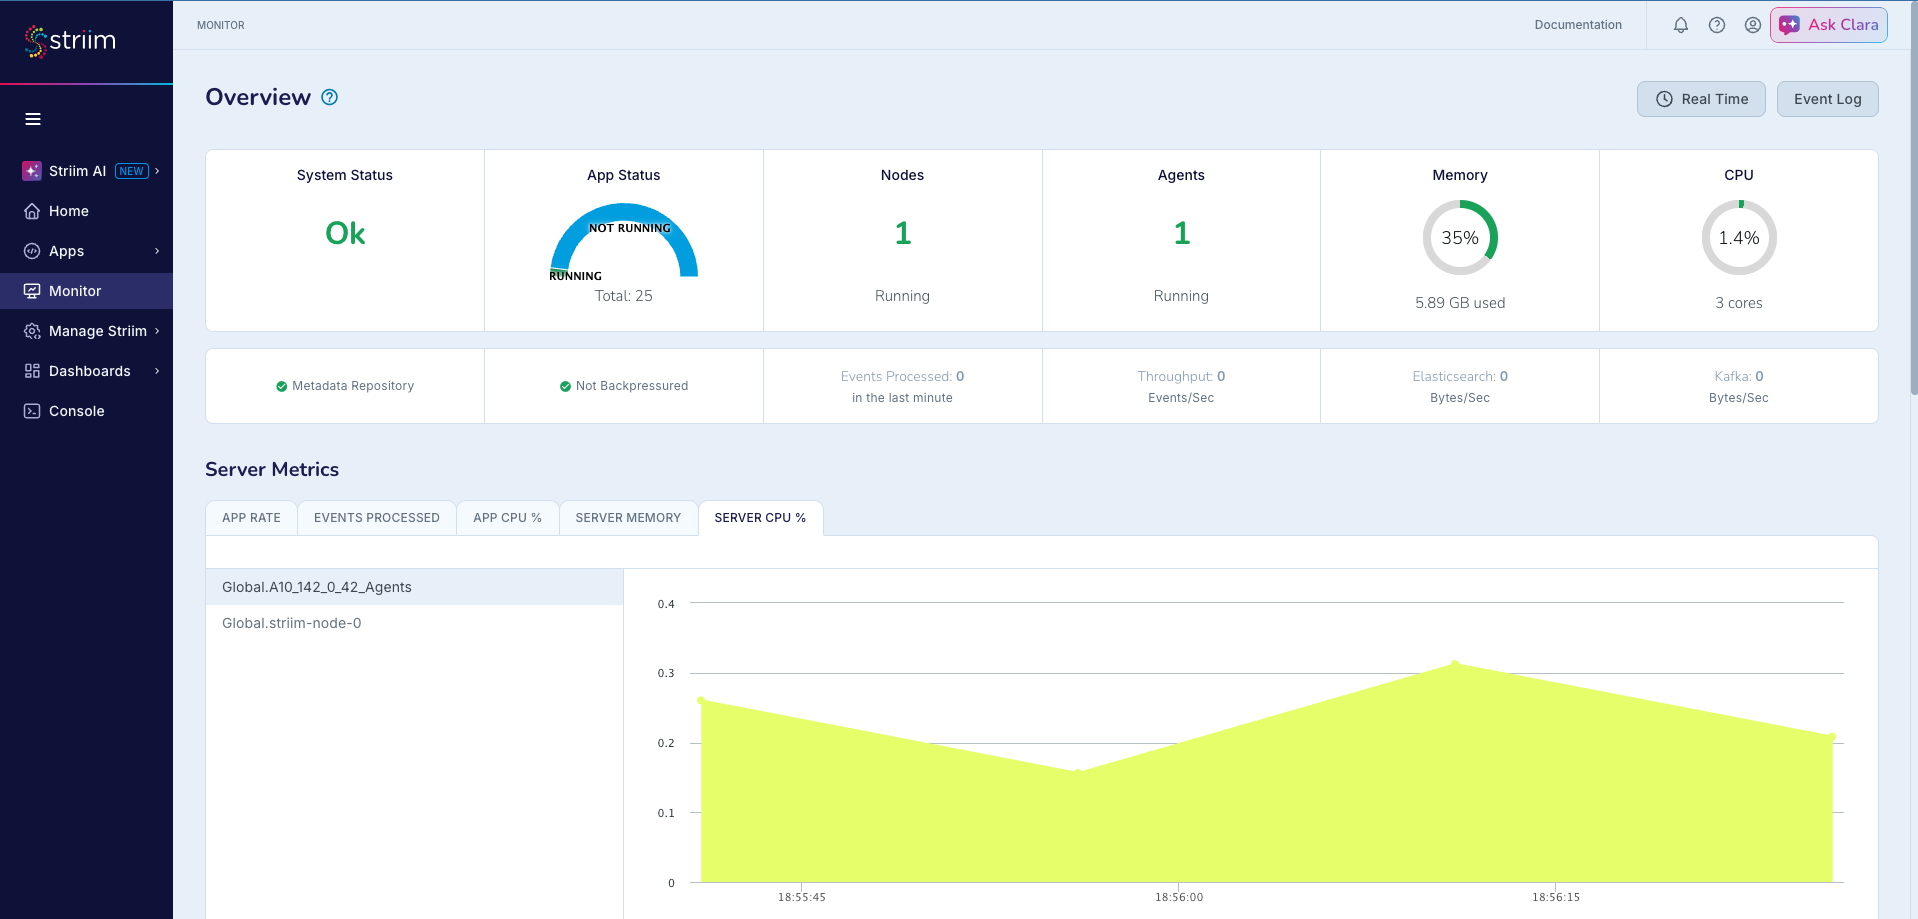
In the Striim UI, go to and confirm:
The agent appears as connected.
CPU and memory metrics are visible for the agent VM.
Upgrading an existing Agent to the latest Striim Cloud versions
Follow these steps if your Striim service has been upgraded to 5.4.2 and you need to update an existing agent.
Stop the existing Agent
On the agent VM:
cd /opt/striim/Agent/bin
sudo ./stopAgent.sh
Confirm the agent process has stopped before continuing.
Download the new Agent binary
Download the Striim Agent package for your version of Striim Cloud (must match the upgraded service version exactly).
Replace the existing installation:
tar -xvzf Striim_Agent_5.4.2.tgz
sudo cp -r Agent /opt/striim/
sudo chown -R root:root /opt/striim
sudo chmod +x /opt/striim/Agent/bin/*.sh
Important
Keep your existing agent.conf and keystore files (aks.jks, aksKey.pwd) — you will update agent.conf in the next step rather than recreating it from scratch.
Update /etc/hosts
Add the following entries to /etc/hosts, replacing <endpoint-IP> with the PSC endpoint IP address from the Striim email.
<endpoint-IP>  striim-node-0.striim-subdomain.default.svc.cluster.local
<endpoint-IP>  stream-proxy-deployment.stream-proxy-service.default.svc.cluster.local
Note
For Striim Cloud Mission Critical also add:
<endpoint-IP> striim-node-1.striim-subdomain.default.svc.cluster.local
Update agent.conf
Open /opt/striim/Agent/conf/agent.conf and add the two stream proxy lines shown below. Leave all existing settings unchanged.
######################
## Basic fields for agent
######################
striim.cluster.clusterName=Striim
striim.cluster.hazelcast.discovery.enabled=false
striim.cluster.deploymentGroups=Agents
striim.cluster.https.enabled=true
striim.node.servernode.address=striim-node-0.striim-subdomain.default.svc.cluster.local
striim.node.httpPort=30002
striim.node.httpsPort=30003
striim.node.hazelcast.port=30000
striim.hazelcast.client.smartrouting=false
striim.cluster.stream.proxy.address=tcp://stream-proxy-deployment.stream-proxy-service.default.svc.cluster.local:30005
striim.cluster.stream.proxy.heartbeat.address=tcp://stream-proxy-deployment.stream-proxy-service.default.svc.cluster.local:30006
MEM_MIN=256m
MEM_MAX=1024m
Note
For Striim Cloud Mission Critical also add:
<endpoint-IP> striim-node-(n).striim-subdomain.default.svc.cluster.local
If you have multiple nodes, add an entry for each node. For example, for two nodes you would add:
<endpoint-IP>  striim-node-0.striim-subdomain.default.svc.cluster.local
<endpoint-IP>  striim-node-1.striim-subdomain.default.svc.cluster.local
Validate Connectivity
Confirm the agent VM can reach all required ports (including the two new stream proxy ports):
telnet <endpoint-IP> 30000
telnet <endpoint-IP> 30002
telnet <endpoint-IP> 30003
telnet <endpoint-IP> 30005   # New
telnet <endpoint-IP> 30006   # New
telnet <endpoint-IP> 30010
If any of ports 30005, 30006, or 30010 are blocked, update your GCP VPC firewall egress rules to allow them before starting the agent.
Start the Agent
cd /opt/striim/Agent/bin
sudo ./agent.sh
Check the console output for a successful connection message. Then verify in the Striim UI under that the agent appears connected and metrics are visible.
Troubleshooting
Agent does not connect after upgrade. When the Agent does not connect after upgrade, verify the following:
Confirm the agent binary version matches the service version.
Confirm
/etc/hostshas both the striim-node-0 and stream-proxy-deployment entries.Confirm
agent.confhas bothstriim.cluster.stream.proxy.addressandstriim.cluster.stream.proxy.heartbeat.address.Test port 30000 — if it fails, the agent cannot connect regardless of other settings.
Test ports 30005 and 30006 — if they fail, connected state may appear but data flows will stop.
Agent connects but applications stop reading data. This almost always means port 30005 or 30006 is blocked. Test outbound connectivity to those ports and update GCP VPC firewall egress rules if needed.
UnknownHostException: stream-proxy-deployment.stream-proxy-service.default.svc.cluster.local. The stream proxy hostname entry is missing from /etc/hosts. Add the line:
<endpoint-IP> stream-proxy-deployment.stream-proxy-service.default.svc.cluster.local
Then restart the agent.