User and access management
Manage who can access your Striim service and what actions they can perform. You can add users directly, assign roles with specific permissions, or integrate with your organization's single sign-on (SSO) provider.
Adding users to a Striim Cloud service
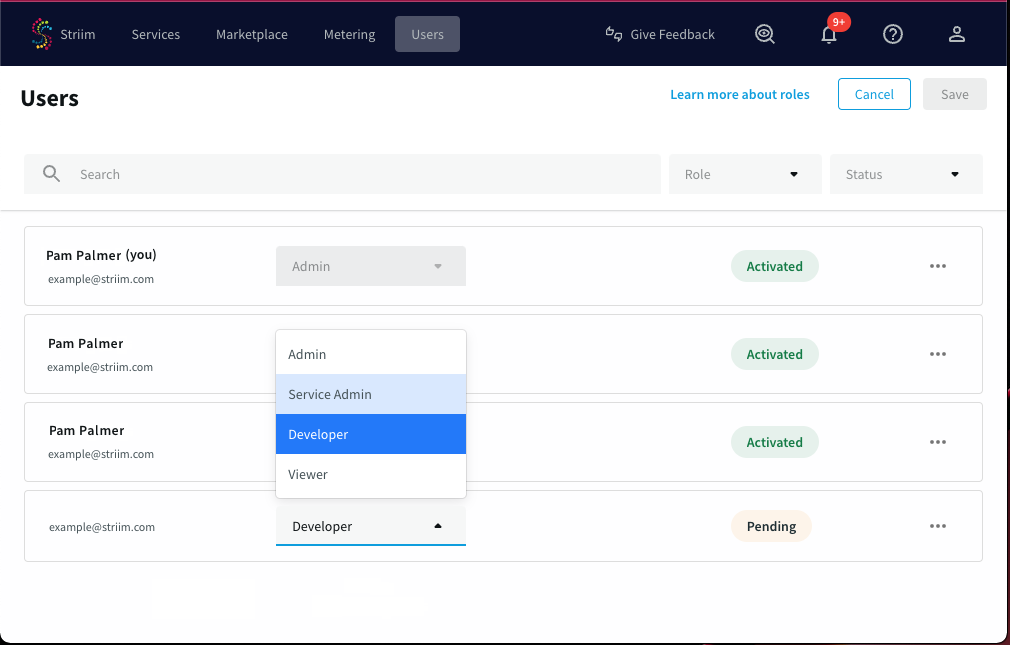
In the Striim Cloud Console, go to the Users page and click Invite User.
Enter the new user's email address, select the appropriate role (see the text of the drop-down for details), and click Save.
The new user will receive an email with a signup link. Once they have signed up, their status will change from Pending to Activated. Once the new user is activated, select ... > Edit, add the service(s) you want them to have access to, and click Save.
If you want the new user to share existing namespaces or applications, launch the service, go to the Users page, and assign the user the appropriate roles (see Managing permissions and roles).
Managing permissions and roles in Striim Cloud
Permissions determine which actions each user can perform in Striim. Permissions are assigned to users through roles. This topic describes the roles and federation behavior for Striim Cloud. For general information about how you will be able to access roles and permissions within Striim services, see Managing permissions and roles.
Striim Cloud provides the following roles that you can assign to users:
Admin: this role has full access: can create, view, delete, and edit users, tunnels, and services, and view billing information. The Admin role can also perform functions that incur costs in the account, such as upgrading or resizing services, and creating SSO configurations.Service Admin: this role has full access to create, view, delete, and edit services. The service admin does not have access to billing or budget-related functions, or user-related functions such as creating an SSO configuration.Developer: this role can view user information, and has limited access to services: can view and launch existing services, and can view tunnels. This role cannot perform functions that incur additional costs in the account, such as creating a service, starting, stopping, or upgrading a service, attaching Kafka to a service, resizing a service, or adding tunnels, or creating a private endpoint for a service.Viewer: provides access to view user, service and tunnel information. When a user has a Viewer role, the role is not federated, and the user will not be able to launch any service. Viewer access is recommended as the access level for users who only need to view services.
Note
The Service Admin role is a new role that you can assign in Striim Cloud that has full access to create, view, delete, or edit services. If you want a role to manage services, you may consider migrating users with a current Developer role to the Service Admin role.
The Viewer role is not federated, and cannot launch a service. To be federated to a service, you may want to migrate your users with a Viewer role to the Developer, Service Admin, or Admin roles.
Federation of roles as admin or non-admin
The Admin and Service Admin roles are federated as Global.admin or Global.appadmin, respectively (which are admin federations), with the difference that the Service Admin does not have user management privileges in Striim Cloud, such as adding or deleting a user.
Developer roles are federated as Global.appdev (a non-Admin federation) for a particular service. Developers were earlier federated as admin - and those existing using with this role will not be changed. If you want to change this manually, you can change it by selecting Edit role from the Users page in Striim Cloud. See Managing permissions and roles.
The Viewer role cannot be federated to a service.
Role based access control permissions
The following table describes the permissions available to each role. A user can launch a service only if federated to the service. A Developer's permissions, such as associating and disassociating observability tools, also depend on being federated to the service.
Permission | Admin | Service Admin | Developer | Viewer | |
|---|---|---|---|---|---|
User management | List all users | ✓ | ✓ | ✓ | ✓ |
View a user's details | ✓ | ✓ | ✓ | ✓ | |
Invite a new user | ✓ | ||||
Delete a user | ✓ | ||||
Change a user's role | ✓ | ||||
Service management | Access service listing page | ✓ | ✓ | ✓ | ✓ |
Access service details page | ✓ | ✓ | ✓ | ✓ | |
Create a service | ✓ | ✓ | |||
Delete a service | ✓ | ✓ | |||
Start/stop a service | ✓ | ✓ | |||
Upgrade a service | ✓ | ✓ | |||
Attach Kafka to a service | ✓ | ✓ | |||
Apply/revert patches on services | ✓ | ✓ | |||
Resize service VM | ✓ | ✓ | |||
Increase number of Striim nodes for a service | ✓ | ✓ | |||
Billing | View the metering page | ✓ | |||
Tunnels | List tunnels for a service | ✓ | ✓ | ✓ | ✓ |
Create a tunnel for a service | ✓ | ✓ | |||
Delete a tunnel for a service | ✓ | ✓ | |||
User federation | List users federated to a service | ✓ | ✓ | ✓ | ✓ |
Federate, defederate, activate, or deactivate a user to a service | ✓ | ✓ | |||
Credit accounts | List credit accounts | ✓ | ✓ | ✓ | ✓ |
Update credit account information | ✓ | ||||
SSO | View SSO configuration | ✓ | ✓ | ✓ | ✓ |
Create SSO configuration | ✓ | ||||
Delete SSO configuration | ✓ | ||||
Schedules | View schedule configurations | ✓ | ✓ | ✓ | ✓ |
Create schedule for a service | ✓ | ✓ | |||
Delete schedule for a service | ✓ | ✓ | |||
Budgets | View budgets | ✓ | ✓ | ✓ | ✓ |
Create a budget | ✓ | ||||
Update a budget | ✓ | ||||
Delete a budget | ✓ | ||||
Private endpoints | View private endpoint details | ✓ | ✓ | ✓ | ✓ |
Create a private endpoint for a service | ✓ | ✓ | |||
Update a private endpoint | ✓ | ✓ | |||
Delete a private endpoint | ✓ | ✓ | |||
Observability | Add observability tool for an account | ✓ | ✓ | ||
Update observability tool for an account | ✓ | ✓ | |||
Delete observability tool for an account | ✓ | ✓ | |||
View observability tool API token | ✓ | ✓ | |||
Associate observability tool to a service | ✓ | ✓ | ✓ | ||
Disassociate observability tool from a service | ✓ | ✓ | ✓ | ||
Alerts | Create a new alert rule | ✓ | |||
View all created alert rules | ✓ | ✓ | ✓ | ✓ | |
Modify an existing alert rule | ✓ | ✓ | |||
Enable or disable an alert rule | ✓ | ✓ | |||
Delete an alert rule | ✓ | ||||
View alerts history list | ✓ | ✓ | ✓ | ✓ | |
Striim AI | View AI Insights tab | ✓ | ✓ | ✓ | ✓ |
Can enable Striim AI for a service | ✓ | ✓ | |||
Can disable Striim AI for a service | ✓ | ✓ |
Managing users using single sign-on (SSO)
The following topics describe how to implement SSO by integrating Striim with Microsoft Entra (formerly Azure AD), Okta, or Ping Identity. The Striim admin must first create a SAML-based application integration from the IdP to Striim, configure Striim to use the identity provider (IdP) for SSO, and then authorize the users in the IdP to use Striim.
Once configured, users can access Striim by one of two methods:
By federating into Striim through the identity provider
By directly logging in through the SSO option on the Striim login
When a user first logs in from the IdP to Striim, the user and namespace are created in Striim.
For more information, see Using Striim with Microsoft Entra ID, Using Striim with Okta.
Using Striim with Microsoft Entra ID
The Microsoft Entra application gallery is a collection of software as a service (SaaS) applications that have been pre-integrated with Microsoft Entra ID (formerly Azure Active Directory ID). The collection contains thousands of applications that make it easy to deploy and configure single sign-on (SSO) and automated user provisioning. Striim is available in the Microsoft Entra application gallery as a prebuilt identity-ready application.
When you integrate Striim with Microsoft Entra ID, you can control in Microsoft Entra ID who has access to Striim, enable your users to be automatically signed-in to Striim with their Microsoft Entra accounts, and manage your accounts in one central location.
Limitations
Note the following limitations to the integration:
If you make changes in Striim, those changes will not be reflected in Microsoft Entra. You may receive a warning in the provisioning logs page about what attributes was changed. The scenario can happen with any individual field modification such as firstname, lastname or email.
When you remove a user from the Striim application alone, it gets permanently deleted. To bring back the user, you must remove the user completely from Microsoft Entra, create a new user, and associate this newly created user to the Entra application.
Adding Striim from the Microsoft Entra Gallery
Sign in to the Microsoft Entra admin center as at least a Cloud Application Administrator.
Browse to Identity > Applications > Enterprise applications > New application.
In the Add from the gallery section, type Striim in the search box.
Select Striim, from the results panel and then add the app. Wait a few seconds while the app is added to your tenant.
Configuring Microsoft Entra SSO for Striim
Sign in to the Microsoft Entra admin center as at least a Cloud Application Administrator.
Browse to Identity > Applications > Enterprise applications > Striim > Single sign-on.
On the Select a single sign-on method page, select SAML.
On the Basic SAML Configuration section, the application is pre-configured and the necessary URLs are already pre-populated with Azure. You can save the configuration by clicking Save.
The Striim application expects the SAML assertions in a specific format, which requires you to add custom attribute mappings to your SAML token attributes configuration. The following are a list of default attributes.
userName
emails[type eq “work”].value
name.givenName
name.familyName
externalId
The values for these mapping are pre-filled. You can verify or modify these mappings.
On the Set up single sign-on with SAML page, in the SAML Signing Certificate section, find Certificate (Base64) and select Download to download the certificate and save it on your computer.
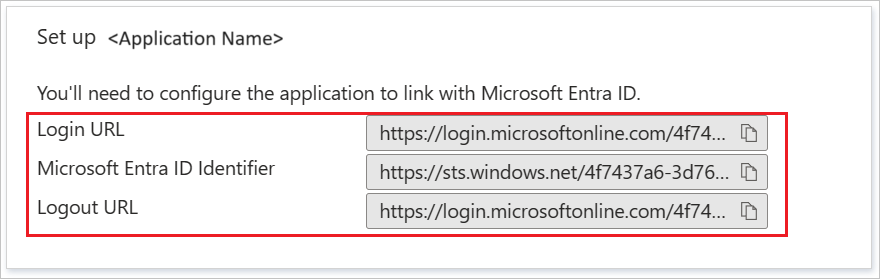
On the Set up Striim section, copy the Login URL and Microsoft Entra Identifier values.
Configuring Striim to trust Microsoft Entra ID as an IdP
Log into your Striim account.
Click User Profiles at the top right of the screen.
Go to the Login & Provisioning tab.
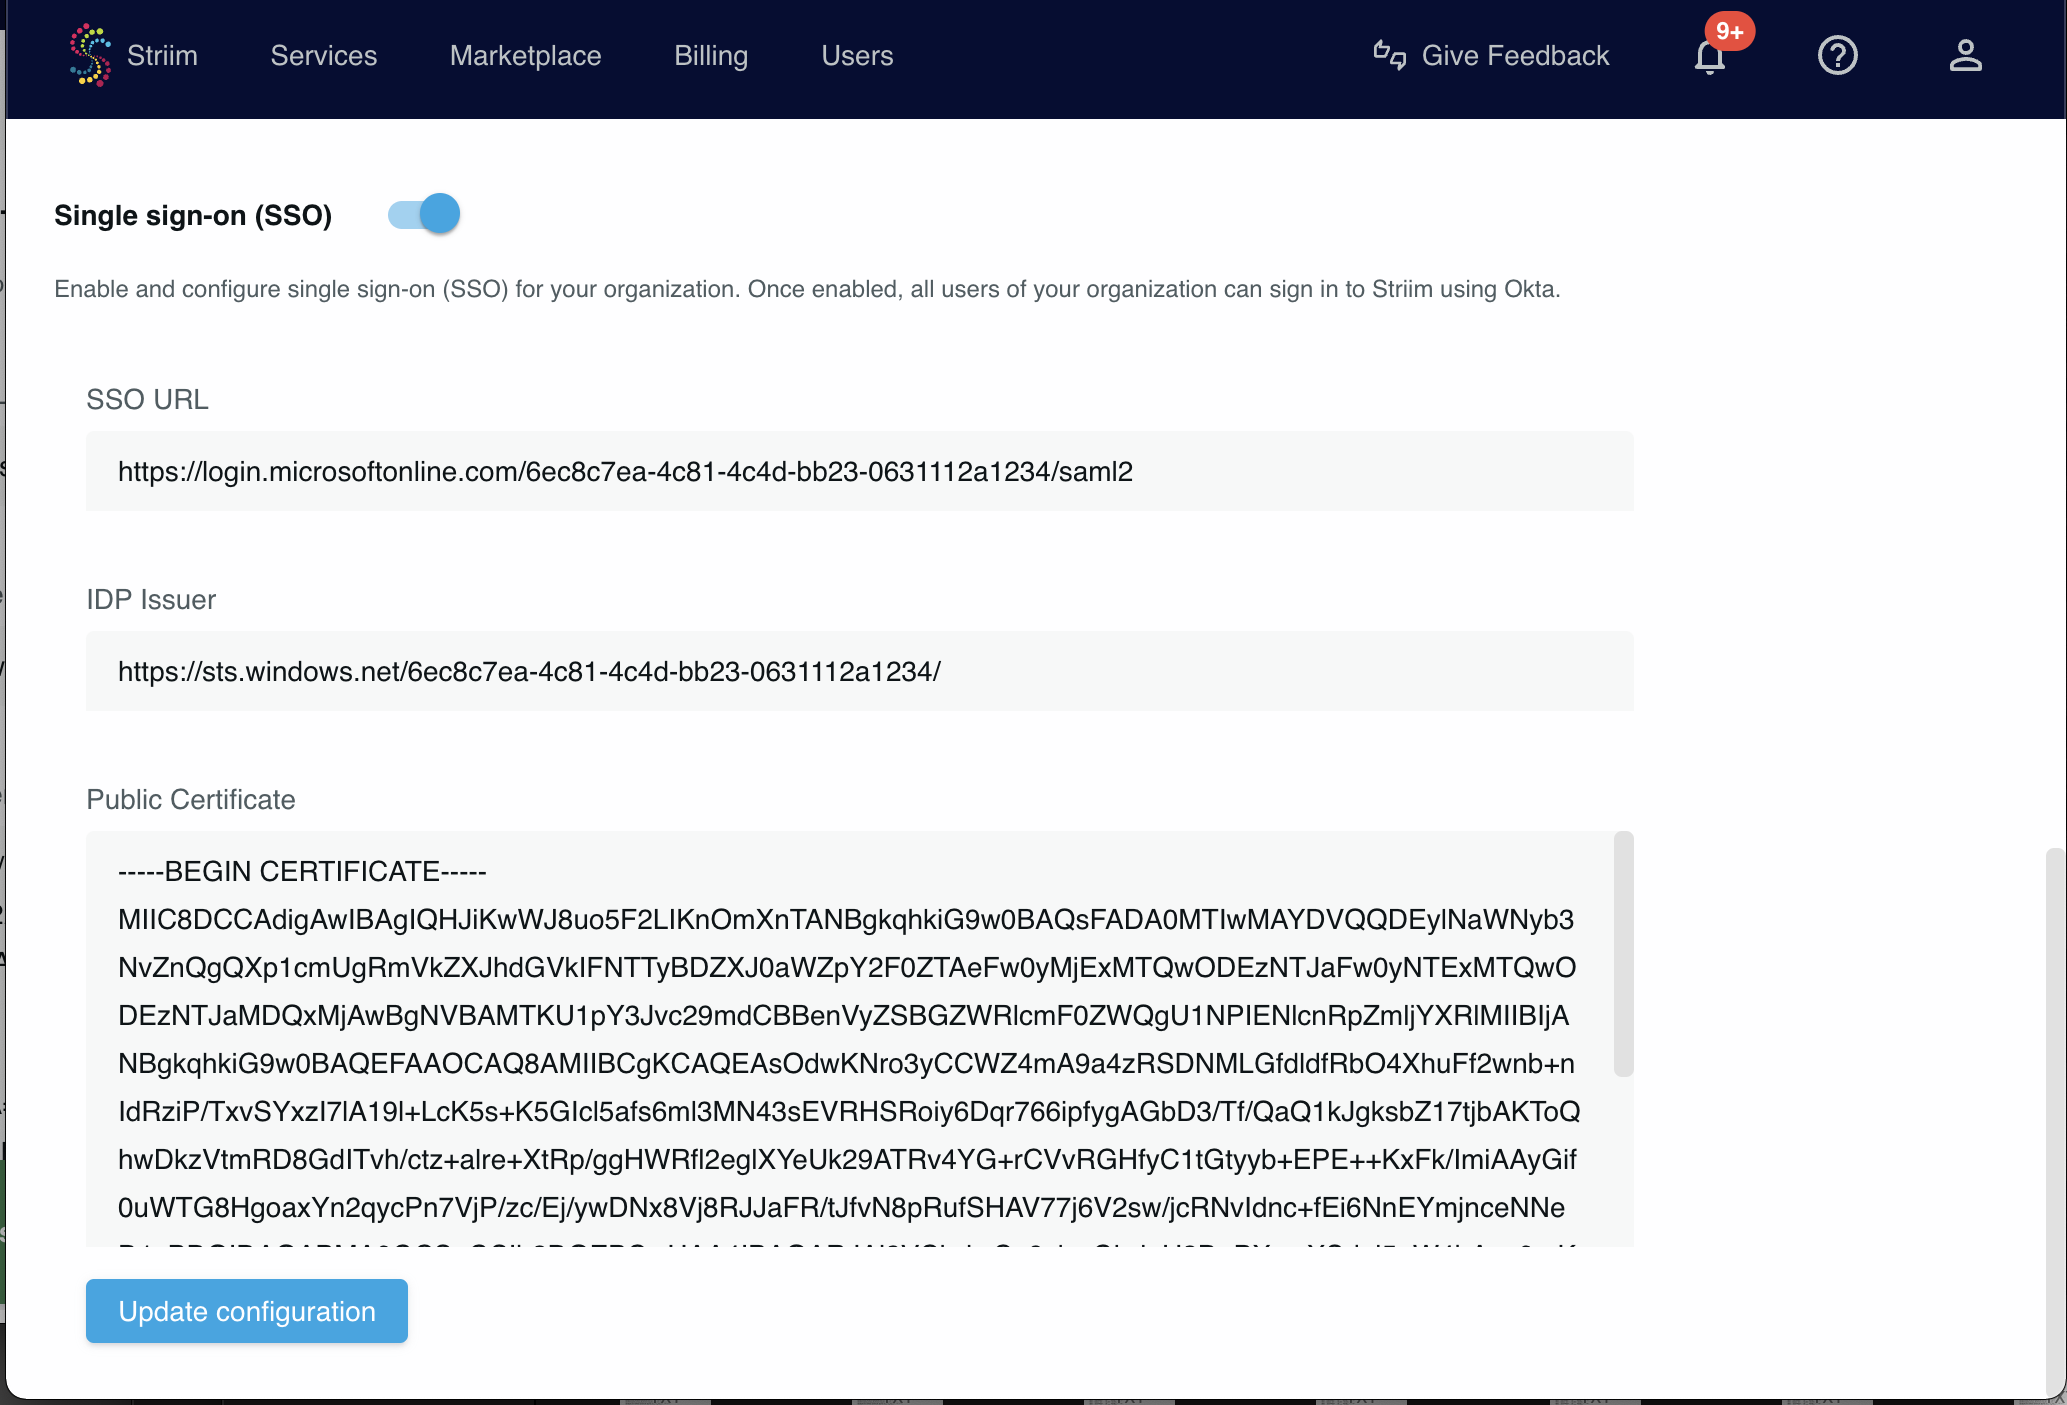
In the Single sign-on section paste the values from Microsoft Entra.
Click Update configuration.
Enable the Single sign-on (SSO) toggle near the top of the page.
Test logging in to your Striim account through Microsoft Entra. Logout then go to the login page and select Sign in with SAML. You will be logged in through Microsoft Entra.
Logging into Striim using SSO
Users can access Striim through the Striim login page or through Microsoft Entra.
To access via the Striim login page, click Use SSO. The user is redirected to the IdP login URL to complete authentication.
To access via Microsoft Entra, select the Striim app in the Microsoft Entra Gallery and federate into Striim.