Using Azure private endpoints with managed services
Note
This topic applies only to Striim Cloud on Azure (Enterprise and Mission Critical).
This topic describes how to configure Azure Private Endpoints to connect Striim Cloud to supported managed services securely and privately. The use of private endpoints as a source or target has been certified with the following Microsoft services:
Azure Cosmos for MongoDB
Azure Data Lake Storage Gen2
Azure Database for MySQL
Azure Databricks
Azure Event Hub
Azure Key Vault
Azure Managed SQL Instance
Azure SQL Database
Azure Synapse (SQL)
Microsoft Fabric Lakehouse
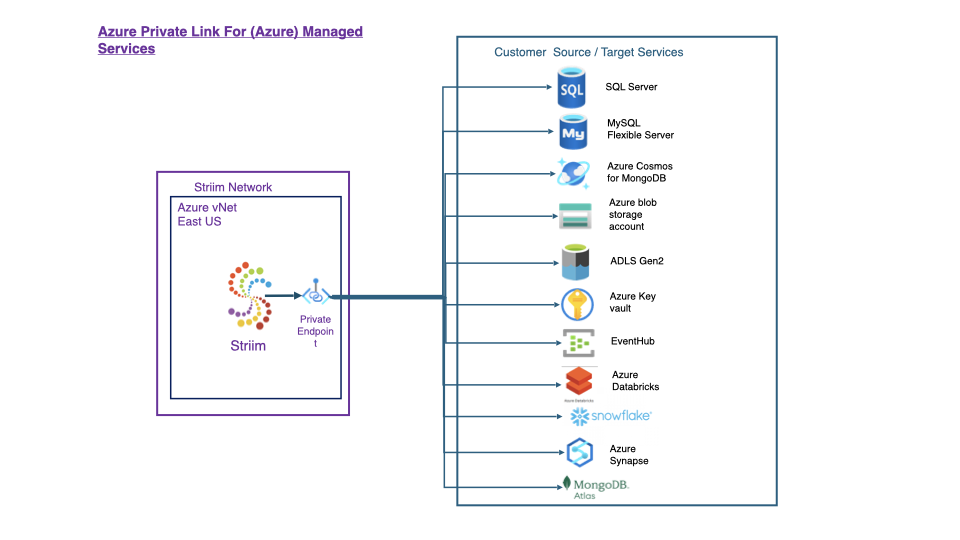
Using private endpoints has been certified with the following non-Microsoft services:
MongoDB Atlas
Snowflake
Databricks
For advanced use cases that require cross-tenant access—such as integrating with Microsoft Fabric Lakehouse—see Using Azure Private Link with Microsoft Fabric Lakehouse.
Note
To configure a private endpoint for Snowflake, contact Striim support.
Prerequisites
You may need permissions in Azure to create a database, virtual machine, standard load balancer, Azure Private Link service, or private endpoint. You may also need permission to approve the endpoints created. Some Microsoft services auto-approve private endpoints.
Before configuring Striim Cloud, do the following in Azure.
For Microsoft services
Get the Resource ID for the Azure-managed service. The Resource ID can be obtained by navigating to the resource in the Azure Portal, selecting Properties and copying the 'ID' field. The tooltip says 'Resource ID'.
For MongoDB Atlas
Create a private endpoint from the MongoDB Atlas endpoint page. This creates a Private Link service which has a Resource ID attached to it. Once you configure the resource ID in Striim Console, you will receive an email from Striim that contains the Resource ID and IP address of the private endpoint. You will use these values to configure the private endpoint in MongoDB Atlas.
See Quickstart: Create a Private Link service by using the Azure portal.
See What is a private endpoint? and related topics.
Configuring an Azure private endpoint in Striim Cloud
Make sure the Striim Cloud service is running.
In the Striim Cloud Console, select the Services tab, then select More > View Details > Secure connection for the Striim Cloud service.
In the Private Endpoints section, click Create Private Endpoint and enter the following:
Name: a unique name for your private endpoint.
Service Alias:
For Microsoft services: enter the resource ID for the service.
For MongoDB Atlas: enter the alias from the Private Link Service page in Azure Portal (see Learn / Azure / Networking / Private Link / What is Azure Private Link service? / Alias).
Click Create Private Endpoint.
The new private endpoint will be in the Creating state while connecting to Azure. For MongoDB only, it will then be in the Pending state until you provide the Resource ID and IP address that you receive through an email from Striim, at which point the state of the private endpoint will be auto-approved and in the Running state.
Other services may require approval before going to the Running state.
The private endpoint in Striim will then be in the Running state.
Specifying Azure private endpoints in sources and targets
For ADLS Gen2 Writer or Azure Event Hub Writer, if a running Striim Cloud private endpoint is associated with the same service as the SAS key specified in the adapter properties, the adapter will use it automatically.
For MongoDB or MongoDB Writer for MongoDB Atlas, obtain the connection string URL from MongoDB Atlas and use this URL in the TQL to connect with the private endpoint. In the MongoDB Atlas Database home page, click on Connect. Click Connect with MongoDB Compass. Copy the provided connection string.
For Database Reader, Database Writer, or MySQL Reader for Azure Database for MySQL:
In the Striim Cloud Console, select the Services tab, then select More > View Details > Secure connection for the Striim Cloud service.
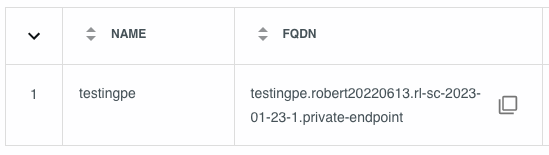
In the Private Endpoints section, copy the appropriate FQDN value and use it in place of the IP address, host name, or network name in the adapter's Connection URL property value.
Using Azure Private Link with Microsoft Fabric Lakehouse
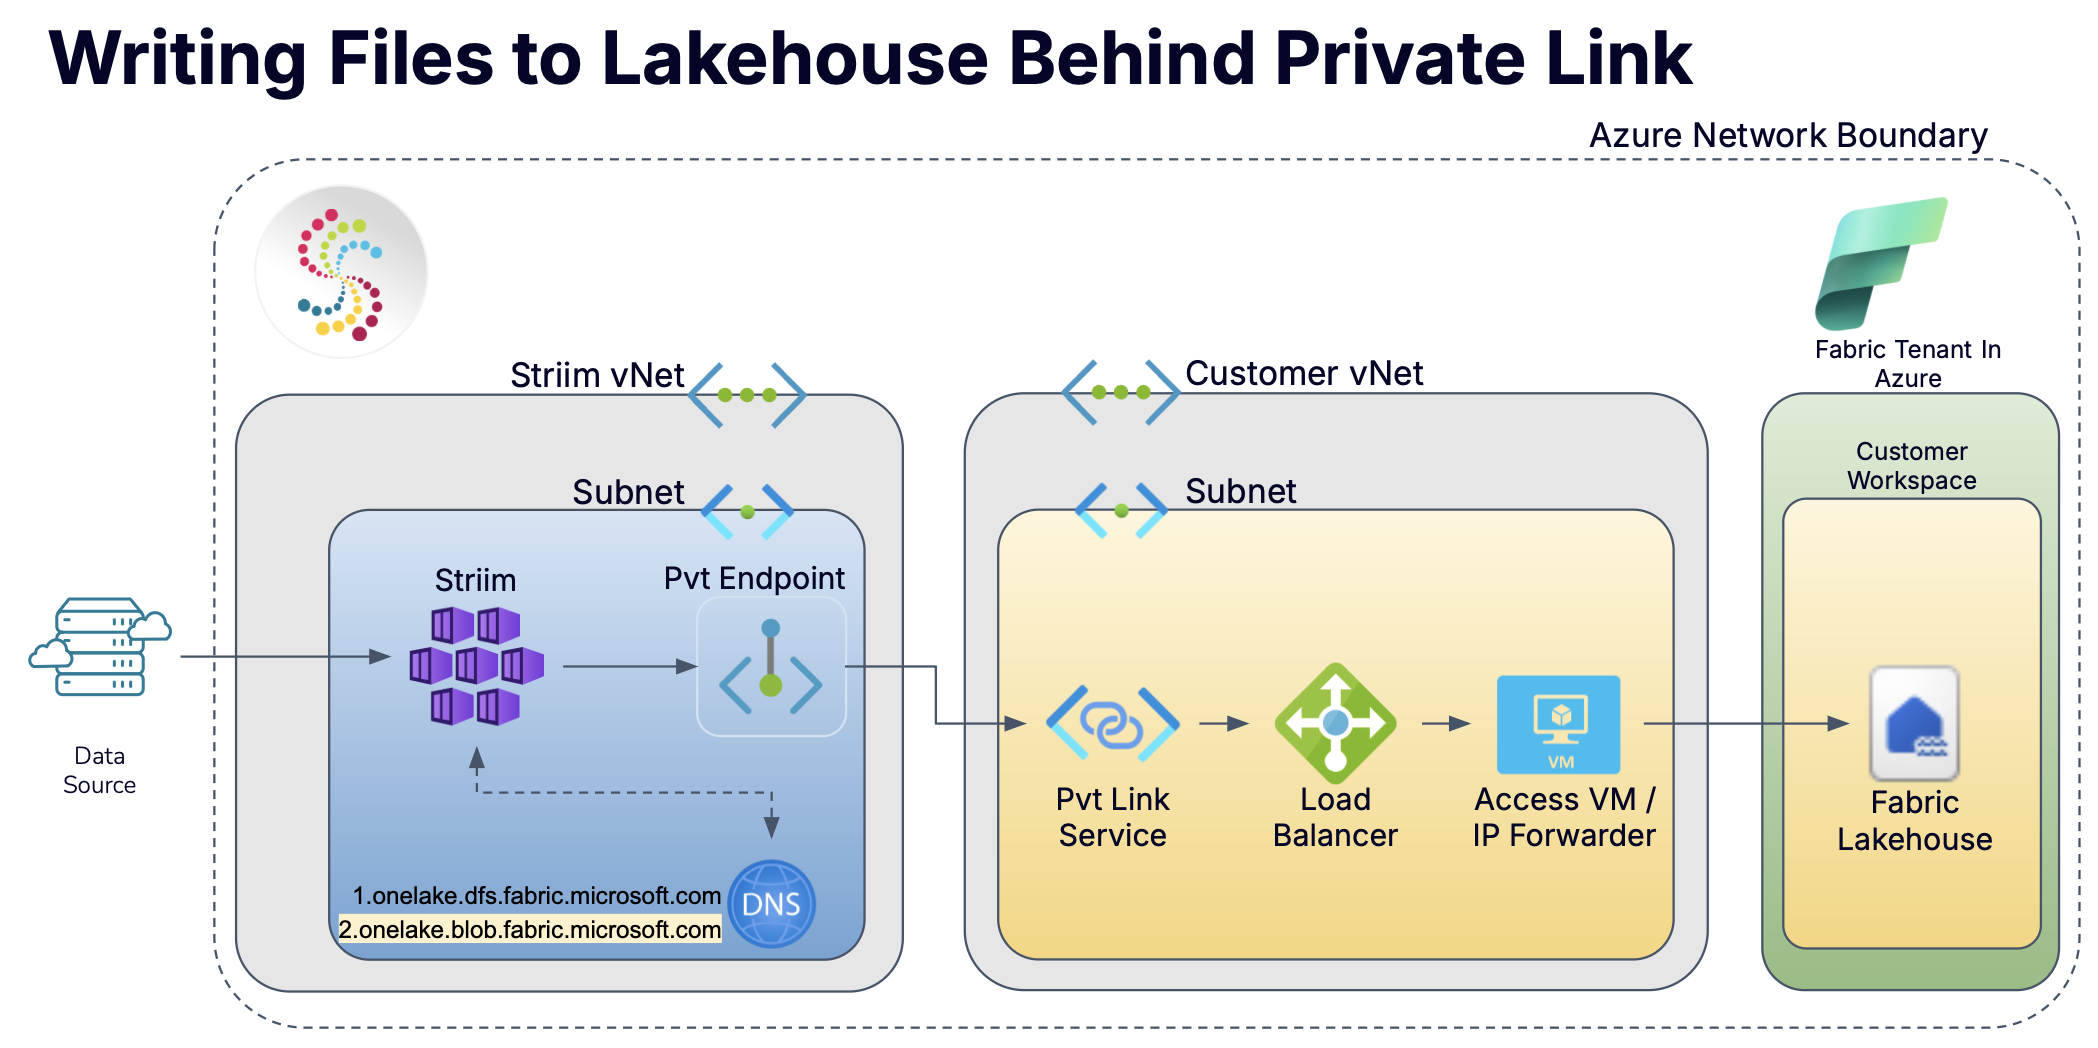
Striim Cloud supports connecting to Microsoft Fabric Lakehouse using Azure Private Link. Unlike standard Azure-managed services, this integration requires a cross-tenant setup using a Private Link Service and additional components such as a forwarding virtual machine and private DNS configuration.
Overview
The Microsoft Fabric Lakehouse integration involves routing API traffic from the Striim Cloud cluster to onelake.dfs.fabric.microsoft.com using a Private Link Service hosted in a customer-managed tenant. This setup ensures secure, private access to the Lakehouse service using custom routing and DNS resolution.
Required Azure services
This integration requires several Azure services to securely route Microsoft Fabric Lakehouse traffic to Striim Cloud using Azure Private Link. These components work together to enable cross-tenant connectivity and DNS resolution.
Azure Virtual Network (VNet): Provides the private, isolated network space for deploying all infrastructure. Includes address space and multiple subnets for organizing the load balancer, forwarding VM, and DNS services.
Subnets: Recommended to create at least two subnets—one for the forwarding VM and one for the load balancer. A third subnet may be used for DNS resources.
Azure virtual machine: A Windows-based VM handles HTTPS port forwarding. Must support IP forwarding and be configured with persistent private IP addressing.
Internal load balancer: Distributes HTTPS traffic from the Private Link Service to the forwarding VM. Requires TCP health probes and load balancing rules for port 443.
Private Link Service: Connects the internal load balancer to external Azure tenants such as Striim Cloud. Generates a service alias used to configure the private endpoint.
Creating the virtual network
Set up a virtual network to provide isolated, secure communication between the required infrastructure components.
Note
This topic focuses on configuration concepts and required Azure components. For UI-based walkthroughs and screenshots, see Using Azure private endpoints with self-managed services.
In the Azure portal, go to Create a resource > Networking > Virtual network.
Choose your Azure subscription and create or select an existing resource group.
Enter a descriptive name for the virtual network and choose a region compatible with the target services.
Configure an address space large enough to accommodate multiple subnets (for example, 10.0.0.0/16).
Create at least two subnets within the VNet:
One subnet for deploying the forwarding virtual machine.
One subnet for the internal load balancer.
Optionally, create a third subnet for private DNS configuration if needed.
Review the configuration and select Create to deploy the virtual network.
Deploying a forwarding virtual machine
Set up a Windows-based virtual machine to handle port forwarding to the Microsoft Fabric Lakehouse endpoint.
In the Azure portal, navigate to Create a resource > Compute > Virtual Machine.
Select Windows Server as the image and choose the appropriate region and resource group.
Provide a name, configure the size, and set authentication settings (password or SSH key).
Under Networking, choose the virtual network and subnet designated for the forwarding VM.
Enable IP forwarding and optionally assign a static private IP address.
After deployment, configure the Windows registry setting
IPEnableRouter=1to allow packet forwarding.Allow RDP or SSH access to connect and manage the VM as needed.
Example SSH command for Linux VM access:
ssh -i <private key path> azureuser@<VM_ip>
Configuring IP Routing and Port Forwarding in the Virtual Machine
After deploying the forwarding virtual machine, configure it to support IP routing and HTTPS traffic forwarding to the Microsoft Fabric endpoint.
Open the Windows Registry Editor on the VM and set
HKLM\SYSTEM\CurrentControlSet\Services\Tcpip\Parameters\IPEnableRouterto1.Restart the VM to apply the registry change.
Open PowerShell as an Administrator and run the following commands to set up port forwarding and a firewall rule:
netsh interface portproxy add v4tov4 listenport=443 listenaddress=0.0.0.0 connectport=443 connectaddress=<Fabric endpoint IP>
New-NetFirewallRule -DisplayName "Allow HTTPS Traffic" -Direction Inbound -LocalPort 443 -Protocol TCP -Action Allow
netsh interface portproxy show all
Replace
<Fabric endpoint IP>with the actual IP address resolved foronelake.dfs.fabric.microsoft.com.Verify that the port proxy is working by using
netstator similar tools to inspect listener behavior on port 443.
Configuring a load balancer
To enable Private Link access, configure a standard SKU internal load balancer in the same virtual network as the forwarding virtual machine.
Navigate to the Azure portal and select Create a resource > Networking > Load Balancer.
Choose Internal for the type and Standard for the SKU.
Specify the virtual network and subnet where the forwarding VM is deployed.
Create a frontend IP configuration for the load balancer.
Configure a backend pool and add the forwarding VM to the pool.
Create a health probe for TCP on port 443.
Create a load balancing rule to forward port 443 from the frontend IP to the backend pool using the health probe.
Creating the Private Link Service
Deploy a Private Link Service and associate it with the load balancer’s frontend IP configuration. The Private Link Service acts as the endpoint target that Striim Cloud will connect to.
In the Azure portal, search for Private Link Services and select + Create.
Choose the same subscription and resource group used for the load balancer and VM.
Select the virtual network and subnet where the load balancer is deployed.
Under Frontend IP configuration, select the frontend IP of the previously created load balancer.
Under Backend pool configuration, confirm the backend pool is the one containing the forwarding VM.
Set Auto-approval to Disabled to require manual approval of incoming connection requests.
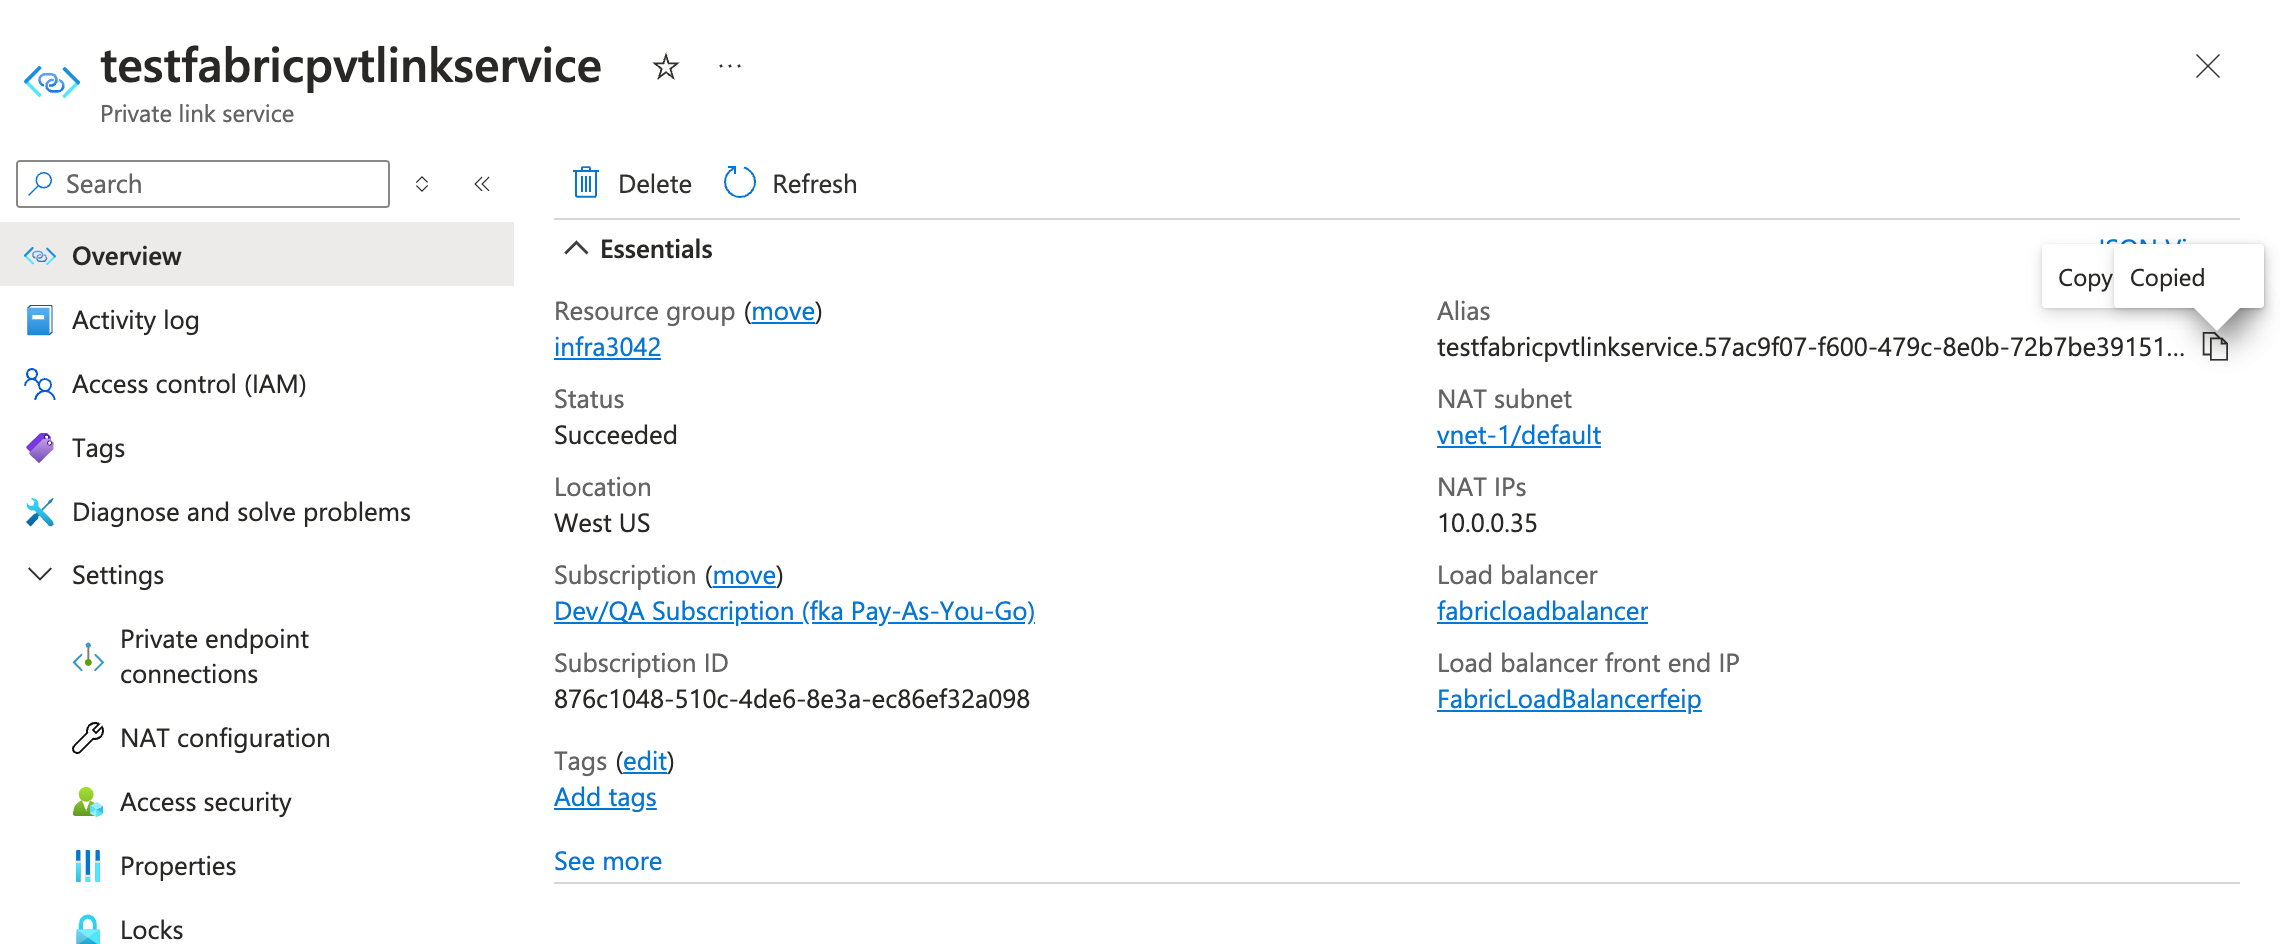
After creation, go to the Properties tab and copy the Alias. You will use this alias when creating the Private Endpoint in the Striim Cloud console.
Forwarding API traffic on the virtual machine
On the Windows-based VM, run the following to configure port forwarding and firewall rules:
netsh interface portproxy add v4tov4 listenport=443 ^
  listenaddress=0.0.0.0 ^
  connectport=443 ^
  connectaddress=<Fabric endpoint IP>
New-NetFirewallRule -DisplayName "Allow HTTPS Traffic" -Direction Inbound -LocalPort 443 -Protocol TCP -Action Allow
netsh interface portproxy show all
Creating the private endpoint in Striim Cloud
In the Striim Cloud Console:
Navigate to your Striim service and select Secure Connection.
Click Create Private Endpoint.
Enter a meaningful name (max 14 characters, must start with a letter, end with a letter or number, and contain only dashes) and paste the Private Link Service Alias copied from Azure.
Click Create.
Striim backend DNS update
Once the private endpoint is created, contact Striim to apply a backend DNS update for onelake.dfs.fabric.microsoft.com to enable full name resolution.
Testing connectivity and verifying integration
Deploy a test application in Striim Cloud using the FabricLakehouseFileWriter adapter. If data transfer succeeds, the endpoint, forwarding, and DNS configuration are working as expected.
Responsibility summary
All infrastructure (steps 1–6) must be created in the customer's Azure subscription.
Linking is required to support API traffic routing.
Striim must apply a backend DNS configuration for full name resolution support.