Building a pipeline with Zendesk Reader
You can read data from Zendesk using the Zendesk Reader and write to any target supported by Striim.
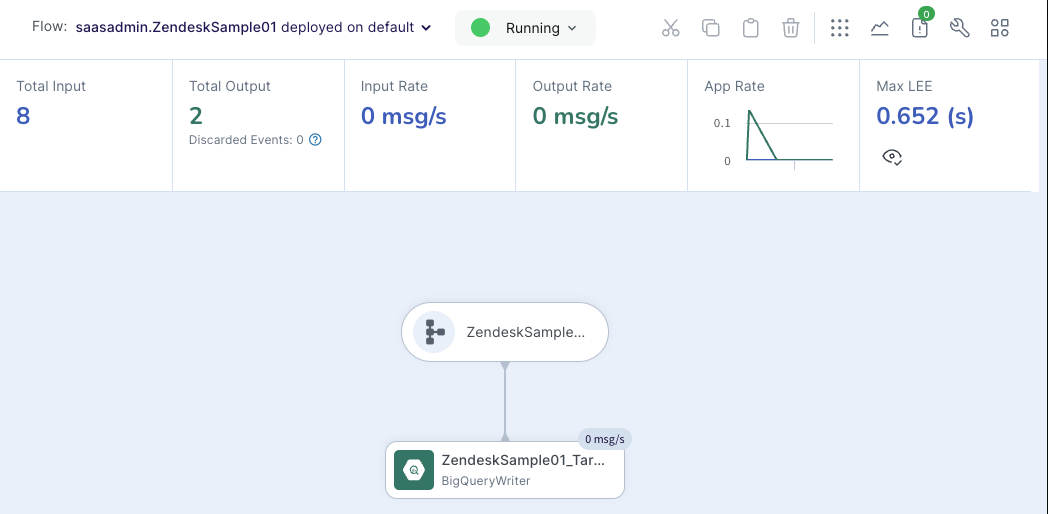
We recommend that you create a single Striim application using the Reader in Automated mode. In this mode, the Reader performs an initial load of existing data and automatically transitions to continuous incremental replication after the initial load has completed. For foundational concepts about pipeline phases, see Pipelines.
Reader modes
The Zendesk Reader supports three modes.
Mode | Description | When to use | Wizard | Flow Designer, TQL, API |
|---|---|---|---|---|
Automated (recommended) | Performs an initial load of the selected objects and then automatically transitions to continuous incremental replication without requiring manual intervention. | Use this mode for most pipelines, especially when you are building a new pipeline. | Yes | Yes |
Initial Load | Performs a one-time snapshot of the selected objects and does not continue with continuous incremental replication after completion. | Use this mode when you need to run the initial load separately from incremental replication or to perform an ad hoc resynchronization of the source data. | No | Yes |
Incremental Load | Continuously replicates new or updated records using a configured watermark field and polling interval. | Use this mode if the initial load has already been completed and you want to replicate only new or updated data going forward. | No | Yes |
Two ways to build a Zendesk pipeline
Before creating a pipeline, complete the required setup and configuration steps in Zendesk as described in Initial setup.
You can build pipelines in one of two ways: using the pipeline wizard (recommended), or manually using Flow Designer, TQL, or the REST API.
Using the pipeline wizard (recommended)
If you are building near-real-time pipelines from Zendesk to supported targets, we recommend using a wizard from the Create App page to build an application that reads from Zendesk. The wizard automatically:
Creates a single application using the Reader in Automated mode.
Configures both initial load and continuous incremental replication.
Creates the target schema and tables that match the selected objects.
Copies existing data during the initial load phase.
Automatically transitions to incremental replication when the initial load completes.
Configures watermark tracking and polling intervals.
The wizard simplifies setup, promotes best practices, and reduces configuration errors.
Creating a pipeline manually
If your use case or organizational policies do not allow the use of the pipeline wizard (for example, you are using a CI/CD system to move configurations to production) or if the wizards do not support your target, you can manually create and configure an application using Flow Designer, TQL, or the Striim REST API.
When creating a pipeline manually, set the Reader's Mode property to Automated. This allows a single application to handle both initial load and continuous replication without requiring changes between phases. You may also use the Reader in Initial Load or Incremental Load mode when your architecture requires separate applications for each phase.
Configuration guidelines
When configuring the Zendesk Reader, follow these best practices.
Set the Reader mode. Choose the mode that aligns with your use case. We recommend that you start with Automated mode.
Identify the Incremental Load Marker. Before performing the initial load, identify a reliable, monotonically increasing field for each object (for example, a last-modified timestamp). In the Incremental Load Marker property, specify this using the format
<object_name>=<field_name>. If all objects share the same marker field, you can simply specify<field_name>. This field is used as the watermark for incremental replication. If an object does not have such a field, the system performs a full table copy during each incremental sync.Configure schema creation. If the required schemas do not already exist on the target and you want Striim to create them automatically, enable Migrate Schema. If any tables from the source schema already exist on the target, this operation will fail. If you prefer not to have Striim create target schemas, pre-create target tables using native or third-party utilities and ensure that the target schema is compatible with the source schema. Leave Migrate Schema disabled in this case.
Configure continuous replication. Set the Incremental Load Marker field and the Polling Interval. Configure the target for upsert semantics using appropriate key columns.
Set Start Position (optional). If you need to resume replication from a specific point, provide the last successful watermark value as the Start Position.
Create a Zendesk Reader application using a wizard
Log in to a Striim instance.
From the Apps menu, click Create an App.
Select Zendesk as your source, and specify your target. Click Get Started.
In Name, enter an application name, then select a Namespace from the drop-down.
Click Save.
Enter the Zendesk Connection URL.
Select an authentication method: Authenticate using OAuth or Authenticate using API Token, based on your use case.
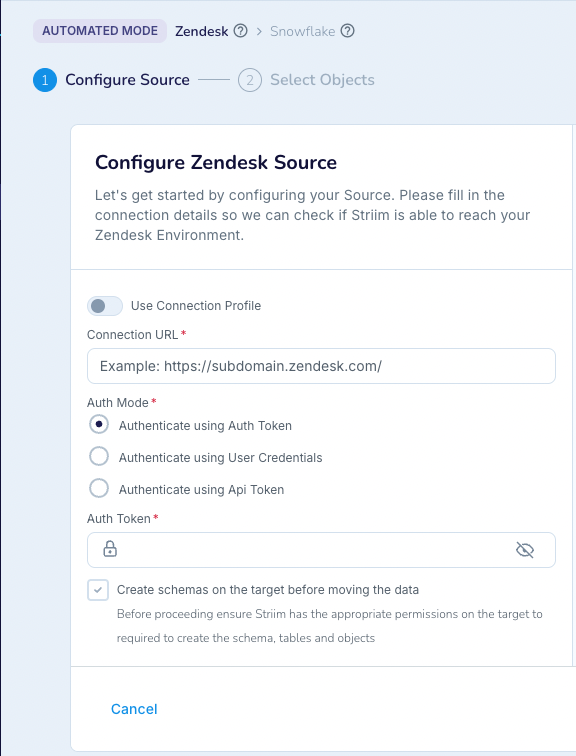
To use OAuth, ensure token access is enabled in the Zendesk Admin Center (Token access toggle in Settings).
If authenticating with OAuth, provide the Auth Token.
If authenticating with API Token, provide the Username and API Token.
Optionally select Create schemas on the target before moving the data.
Click Next. The wizard validates your authentication information and displays the results.
Click Next. The wizard displays a list of objects available on the Zendesk instance.
Select the objects to ingest and click Next to continue.
Configure target details.
Click Next to review the summary information.
Click Save & Run. The application saves and begins running.
Create a Zendesk Reader application using TQL
The following sample shows a minimal Zendesk Reader application in TQL using Initial Load mode. For most pipelines, set Mode to Automated to perform initial load and then automatically transition to incremental replication.
CREATE APPLICATION Zendesk_app;

CREATE SOURCE zendesk_source USING Global.ZendeskReader (
  Mode: 'InitialLoad',
  MaxConnections: 20,
  ThreadPoolCount: '0',
  ZendeskObjects: '%',
  FetchSize: 100,
  ConnectionTimeOut: 60,
  PollingInterval: '120s',
  useConnectionProfile: true,
  connectionProfileName: 'ZendeskAPITokenProfile',
  ConnectionRetries: 3,
  MigrateSchema: true
)
OUTPUT TO zendesk_output;

END APPLICATION Zendesk_app;